Setup development environment
Note
This article is currently outdated as we have done significant changes to the backend of the bot
note
The code for Bulbbot is fully open sourced and we allow the community to contribute to the codebase.
Please note that you may not host your own version of Bulbbot publicly and or provide support for the bot in any way.
You are however allowed to host a private version of the bot that can be used in private servers.
We also offer no support for selfhosting the bot. You're on your own here, so proceed at your own risk!
Steps to configure a local development environment
Prerequisites
- PostgreSQL
- Node.JS (>18.0)
- Git
- Optional, but nice to have: Nodemon
Download the code
$ git clone https://github.com/TeamBulbbot/bulbbot.git
Install packages
$ cd bulbbot
$ npm install # or yarn install
Pre config
$ cp .env.example .env    # copy the .env.example and rename it to .env
$ vim .env                # fill out the env file with the credentials
$ vim Config.ts           # edit this to suite your needs
ENVIRONMENT=prod        # prod or dev
DEVELOPER_GUILD=        # the guild id where you want your developer slash commands to register

TOKEN=                  # discord bot token

DB_URL=postgresql://DB_USER:DB_PASSWORD@DB_HOST:5432/DB_NAME
# DB_USER -> database username
# DB_PASSWORD -> database password
# DB_HOST -> database host
# DB_NAME -> database name

PORT=1234               # backend server port

SENTRY_DSN=             # your sentry url
ENABLE_SENTRY=false     # enable/disable sentry

ENABLE_LOGGING=false    # enable/disable promethus logging
Setting up the Discord Bot
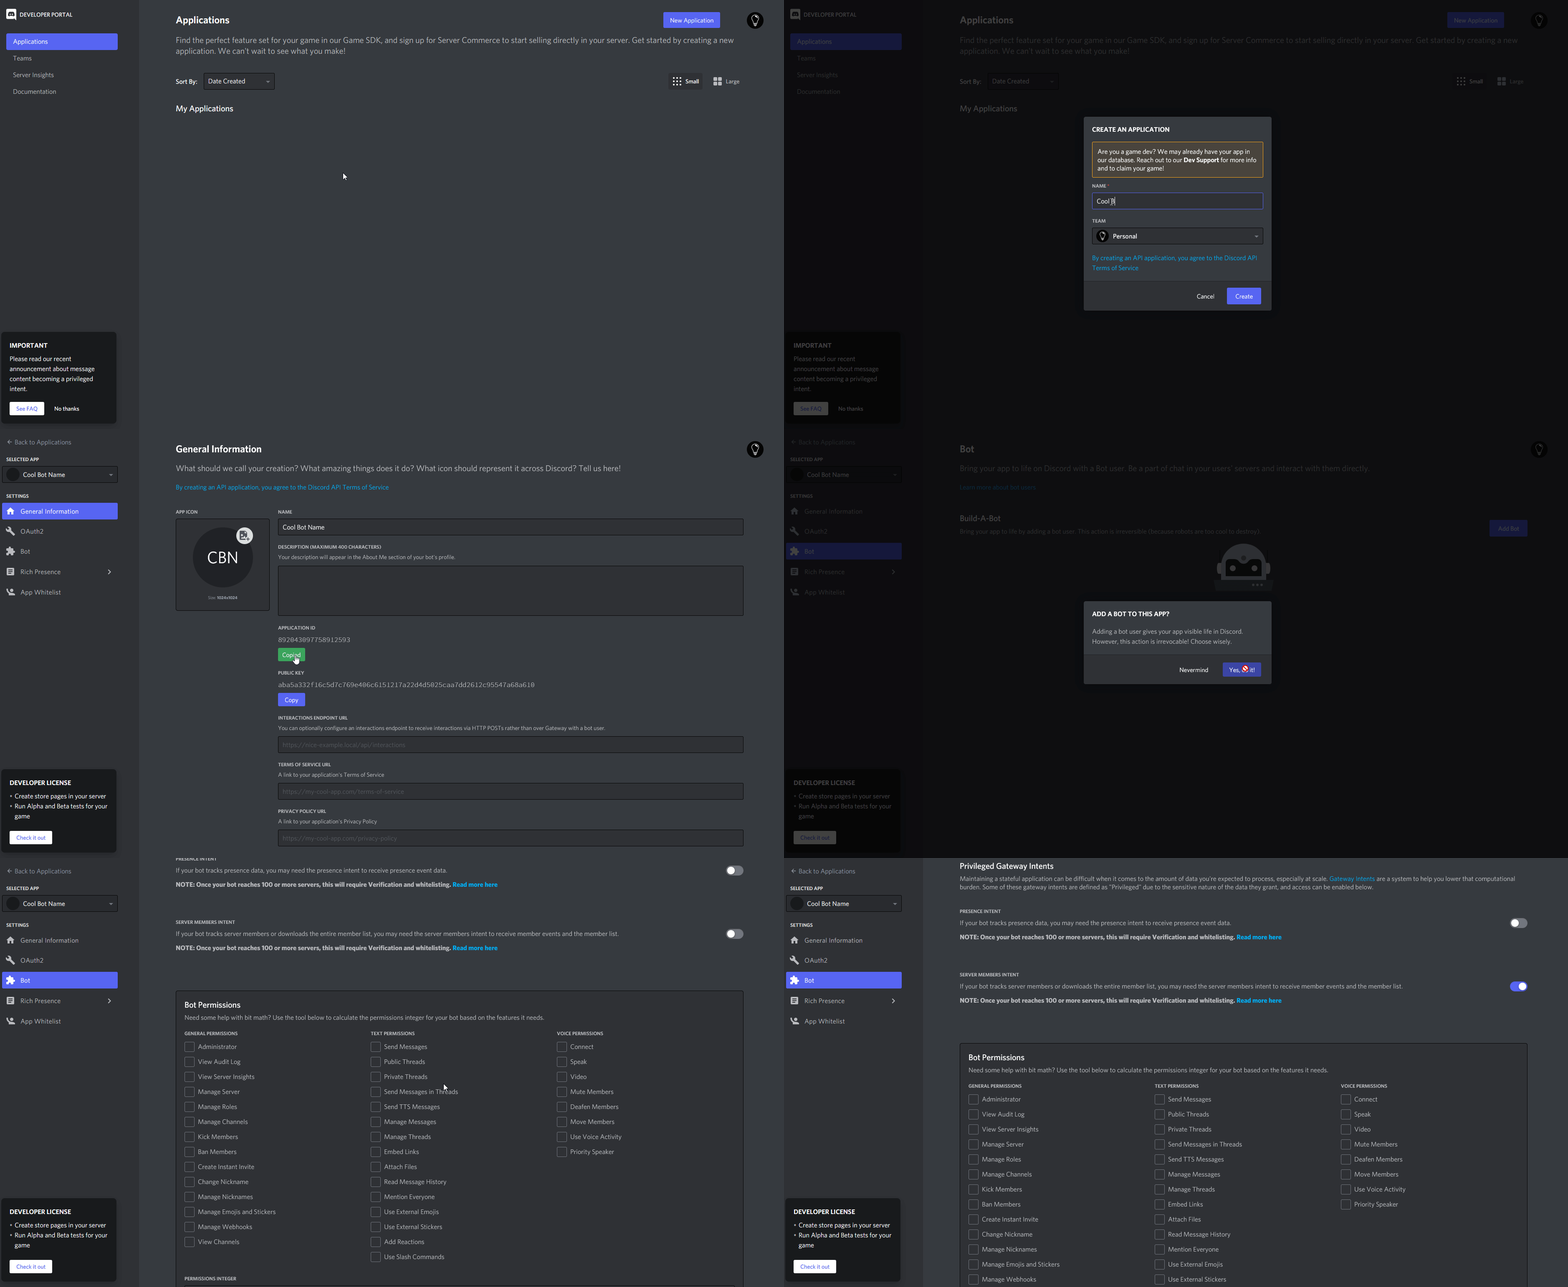
- First go to https://discord.com/developers/applications (sign into with your Discord account if needed)
- Press "New Application"
- Give your application a name (in my case
Cool Bot Name) - Copy the application id (in my case
892043097758912593) - Head over to the "Bot" settings
- Press "Add Bot"
- Press "Yes, do it!"
- Copy the bot token KEEP THIS SAFE (for example
ODkyMDQzMDk3NzU4OTEyNTkz.Totally.Real.Token, this is your Discord bot token) - Scroll down to "Privileged Gateway Intents"
- Toggle the "Server Members Intent"
- The bot can then be added to your server with the url
https://discord.com/oauth2/authorize?client_id=APPLICATION_ID&permissions=261955644663&scope=bot+applications.commands

Setting up the database
- Setup and install PostgreSQL
- Open up
sql shell (psql)
Server [localhost]:         # ip address of the database, localhost for local dev
Database [postgres]:        # default database, leave blank
Port [5432]:                # postgresql port, leave blank if default
Username [postgres]:        # default postgresql username, leave blank if default
Password for user postgres: # postgresql user password
$ SELECT version();                  # if you get output well done you have installed postgresql correctly
$ CREATE DATABASE <DATABASE_NAME>;   # name of the database you want your bot to connect to
- Head back to the main repro and the main folder
$ npx tsc           # build the typescript files
$ npm run sync:db  # or yarn sync:db
Running
$ npm run start     # or yarn start
$ npm run dev       # or yarn dev (if you have nodemon installed )
Updating
$ git pull          # pull the latest code
$ npx tsc           # build the typescript files
# if there was a db change run the sync:db command again
$ npm run sync:db   # or yarn sync:db