Setup development environment (Rust)
The code for Bulbbot is fully open sourced and we allow the community to contribute to the codebase.
Please note that you may not host your own version of Bulbbot publicly and or provide support for the bot in any way.
You are however allowed to host a private version of the bot that can be used in private servers.
We also offer no support for selfhosting the bot. You're on your own here, so proceed at your own risk!
Prerequisites
Installing and running RabbitMQ Docker (recommended)
(Windows Step) Install Docker Desktop
$ docker run --name rabbitmq -p 5672:5672 -p 15672:15672 rabbitmq:management
Optional flags:
-it: Interactive window--rm: Tells docker that the container should automatically be removed after we close docker
Now going to http://localhost:15672 will bring you the management window where you can monitor the queues.
Default username: guest
Default password: guest
Getting a Discord token
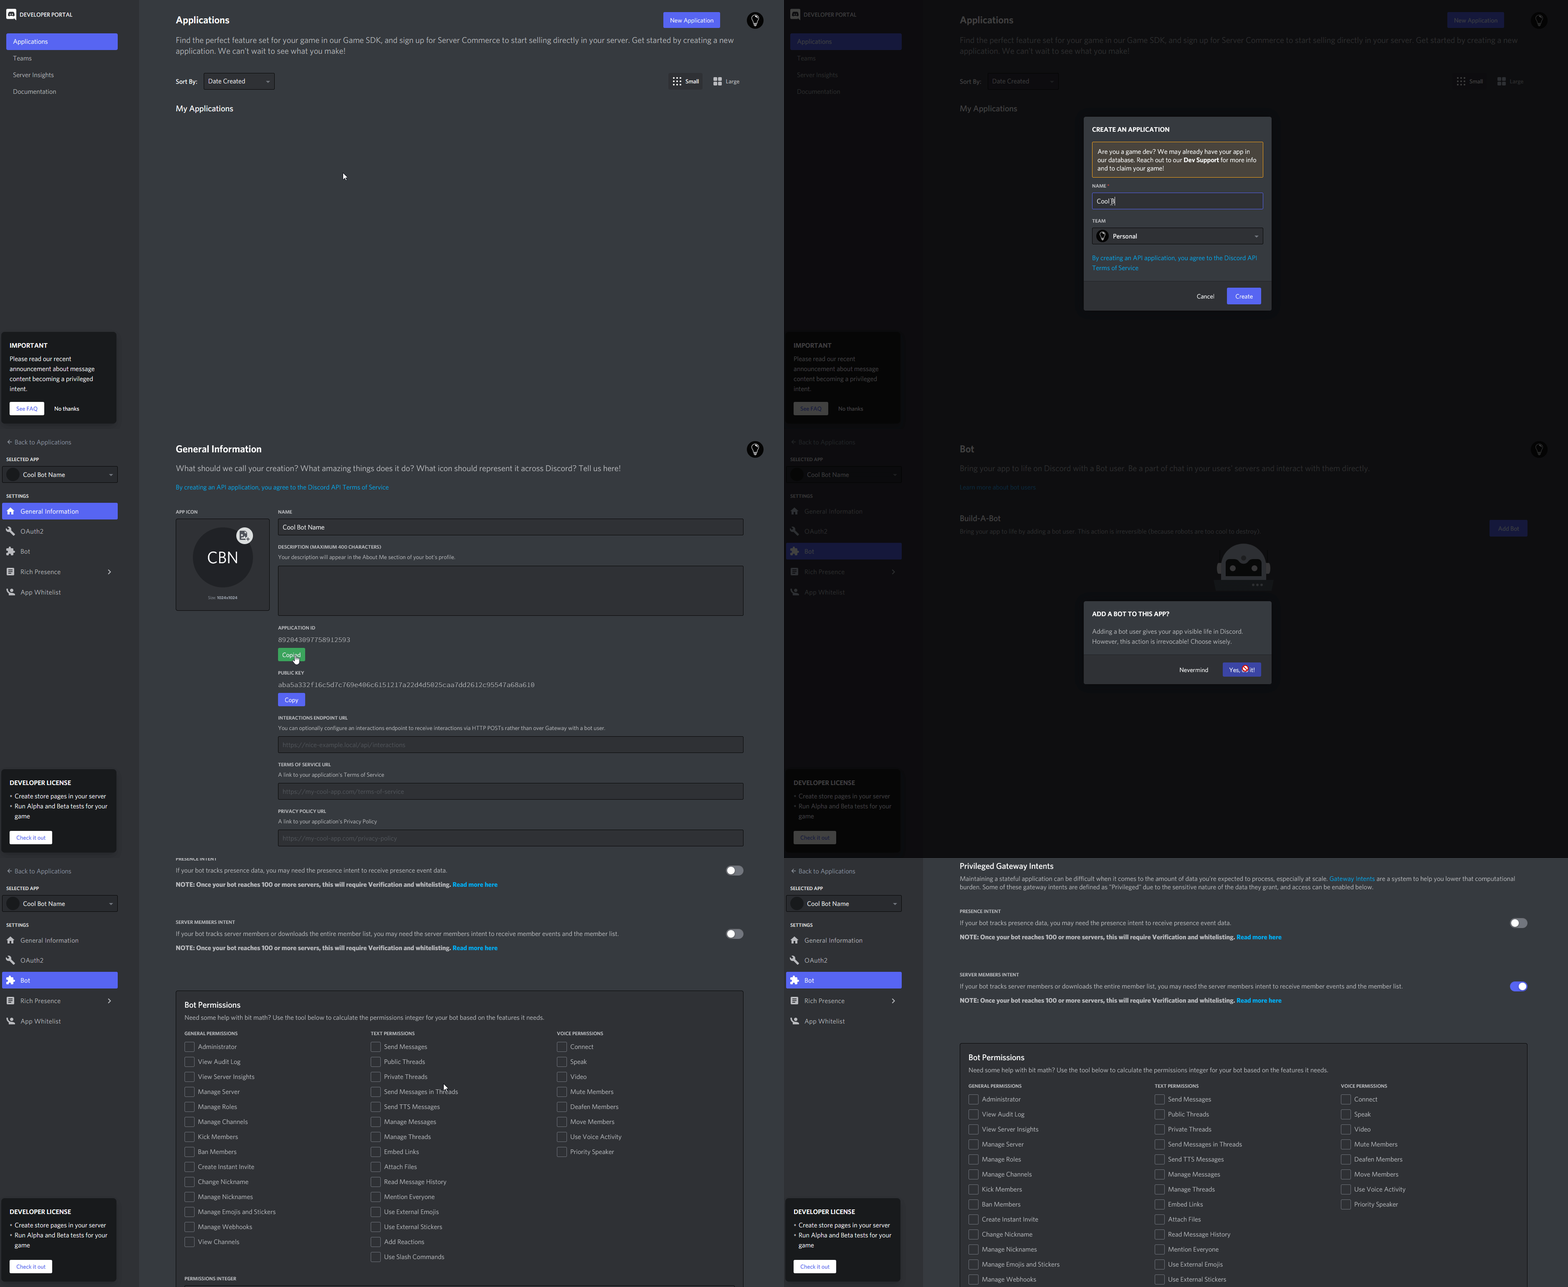
- First go to https://discord.com/developers/applications (sign into with your Discord account if needed)
- Press "New Application"
- Give your application a name (in my case
Cool Bot Name) - Copy the application id (in my case
892043097758912593) - Head over to the "Bot" settings
- Press "Add Bot"
- Press "Yes, do it!"
- Copy the bot token KEEP THIS SAFE (for example
ODkyMDQzMDk3NzU4OTEyNTkz.Totally.Real.Token, this is your Discord bot token) - Scroll down to "Privileged Gateway Intents"
- Toggle the "Server Members Intent" and "Message Content Intent"
- The bot can then be added to your server with the url
https://discord.com/oauth2/authorize?client_id=APPLICATION_ID&permissions=261955644663&scope=bot+applications.commands

Download the code
$ git clone https://github.com/TeamBulbbot/bulbbot-rs.git
Service setup
During each of these services will we assume you are the root of the project the "bulbbot-rs" folder.
bulbbot.Gateway
$ cd bulbbot.Gateway
Copy the env file
$ cp .env.example .env
$ vim .env
bulbbot-rs/bulbbot.Gateway/.env
ENVIRONMENT=development

DISCORD_TOKEN=

RABBIT_MQ_URL=localhost:5672
RABBIT_MQ_USERNAME=guest
RABBIT_MQ_PASSWORD=guest

SERVER_PORT=5171

ZIPKIN_URL=                 # optional, cannot be left empty should be valid http url like http://localhost
After this we should be ready to run the service
$ cargo run
bulbbot.GatewayHandler
$ cd bulbbot.GatewayHandler
Copy the env file
$ cp .env.example .env
$ vim .env
bulbbot-rs/bulbbot.GatewaHandler/.env
ENVIRONMENT=development

RABBIT_MQ_URL=localhost:5672
RABBIT_MQ_USERNAME=guest
RABBIT_MQ_PASSWORD=guest

SERVER_PORT=6167

ZIPKIN_URL=                 # optional, cannot be left empty should be valid http url like http://localhost
After this we should be ready to run the service
$ cargo run
bulbbot.MessageService
$ cd bulbbot.MessageService
Copy the env file
$ cp .env.example .env
$ vim .env
bulbbot-rs/bulbbot.MessageService/.env
ENVIRONMENT=development

SERVER_PORT=3521

DATABASE_URL=postgresql://USERNAME:PASSWORD@DB_HOST:5432/dev-message-service

ZIPKIN_URL=                 # optional, cannot be left empty should be valid http url like http://localhost
Creating the database and tables
$ diesel database setup
After this we should be ready to run the service
$ cargo run
bulbbot.GuildService
$ cd bulbbot.GuildService
Copy the env file
$ cp .env.example .env
$ vim .env
bulbbot-rs/bulbbot.GuildService/.env
ENVIRONMENT=development

SERVER_PORT=4614

DATABASE_URL=postgresql://USERNAME:PASSWORD@DB_HOST:5432/dev-guild-service

ZIPKIN_URL=                 # optional, cannot be left empty should be valid http url like http://localhost
Creating the database and tables
$ diesel database setup
After this we should be ready to run the service
$ cargo run